

Papers, papers everywhere! What happened to our paperless society?
Actually, I think we’re getting closer than ever before with tablet technology becoming so widespread. However, there’s no question that we all have a bunch of paper flowing through our lives and mailboxes.
So many of my clients over the years have really struggled with how to handle all the paperwork. That’s why I’d like to teach you the system that I’ve been using for over a decade as a professional organizer and productivity consultant.
You need to BARFT your papers! I know sounds awful doesn’t it. Fortunately, my clients often get a chuckle when I say it to them because sometimes it feels like the paperwork has barfed all over their world. In reality, BARFT is an acronym for: Bills, Action, Read, File, Trash.
The Paper Organizing Process
Here are the tools you’ll want for this process:
* Your jumbled paperwork piles
* 4 Sticky notes
* 1 pen or sharpie
* Your recycling/trash bin
* Stapler (optional)
* Letter Opener (optional)
On your four sticky notes write: Bills, Action, Read, File. Then, space them out on a table or the floor to remind you of your category options. Pull your recycling or trash bin over near you, and then choose one stack of papers to start your process.
The goal is to identify which of the 5 categories each paper belongs in:
- Bills to Pay – We never want your bills to get lost in the shuffle, that’s why we separate out the ones that are yet to be paid. (Paid bills should be filed or recycled according to your own retention policies.)
- Action Items– Items that require further action or attention- Examples: forms to be completed, vendors that you need to call to clarify, statements that have a mistake to be corrected, an item you want to order online. This is the supporting paperwork that you’ll need to complete a specific action. Preferably, you would capture the appropriate action directly to your Master List of actions. (See below for more about this.)
- To Read – This pile is for magazines, newsletters, catalogs… all those bulky items that aren’t urgent, but you want to be able to flip through them to pull out interesting items at your leisure.
- To File– For statements or important paperwork that you would want to reference in the future and therefore deserves a place in your filing system.
- Trash/Recycle– duh… some stuff we just don’t need anymore. If we’re lucky, this is the biggest pile.
Stuff to pitch immediately:
- Junk mail and advertising– I didn’t ask for this stuff, and it doesn’t deserve my time and attention to review.
- All envelopes – they just add steps and bulk. Open up your statements, staple the pages together, and file it flat in the appropriate category (Bills, Action, File).
- All statement inserts– they’re just advertising like the stuff above, and I recycle them immediately.
Setting Up Your Paper Organizing System
Once you’ve sorted all your random paperwork into those five categories, then next you’ll want to setup a permanent system. You’ll want an ongoing place for your Bills, Action items, To Read, and To File categories to live and be easy to find.
There are many different options that I’ve seen work: paper trays, vertical file holders, wall systems, baskets, etc. The goal is to keep it as easy as possible to interact with, so that it’s rolling-off-a-log-easy to maintain. And please, please… label them clearly.
Here’s a few ideas that I found on Pinterest which might inspire your new paper sorting system:
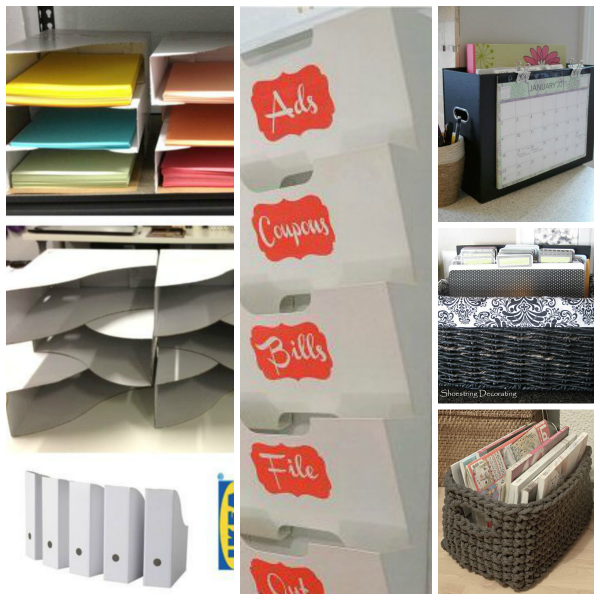
(Pinterest Image Links & Info: Magazine Sorters, Mail Sorter, Countertop File, Wicker Basket, Crochet Basket)
After you’ve created your permanent system you may not need to setup your sticky notes each time you process new paperwork, but I find they can be helpful the first couple times to remind you of your five options.
The Habits to Maintain Your Paper Organizing System
To have this system work effectively there are a few daily and weekly habits that you’ll also need to develop.
1. BARFT your incoming mail and paperwork daily – If you do this simple sort each day when the mail comes in, then it will usually take less than 5 minutes to get that paperwork processed and out of your way.
2. Add Your Action Items to your Master List – Ideally, you don’t want the paper itself to be your reminder to take your action because papers are susceptible to OOS, OOM (Out of Sight, Out of Mind). Therefore, preferably you have started your Master List of actions, and you can capture your new tasks directly onto your Master List. AFTER you’ve done that, then you can file that paper in your Action Items Support bin/basket/folder. Note: Be careful, if you start tossing actions that haven’t been captured into this bin, then you’ll stop trusting your Master List because it doesn’t contain everything (major problem!).
If you have not yet created your Master List for your tasks, then you might want to Click Here to get our free Start Your Master List eGuide. This essential task management system will help you improve your prioritization skills and get the RIGHT things done each day.
3. File your “To Be Filed” weekly – This is a great task to do at the end of a day after your mind is fried. Provided you have a solid filing system, it shouldn’t take much thinking to file things away. However, I know it’s one of those habits that most of us don’t like to do. It can also be a great task to delegate if you have an assistant, intern, or kids who can be taught to help.
4. Keep your “To Read” manageable – I’ve seen clients with “To Read” baskets that literally are two feet tall with magazines and journals. There’s a point at which you need to be honest and acknowledge that you aren’t going to read all of that. If you haven’t gotten to reading it in 3-6 months, then you probably aren’t going to, and it’s time to (preferably) recycle it. This can also give you a great reality check about which subscriptions you might be ready to cancel because they aren’t getting you excited to read them any more.
Next Step
Hopefully, this guide has given you a strategy to conquer your paper clutter challenges and keep them handled effectively and permanently.
With this combination of systems and habits, you’ll be the master of your paper in no time. So, your mission, if you choose to accept it, is to identify 30-90 minutes in your calendar to BARFT your random papers. Make it a priority and get started.
Getting stuck? Have questions? Then, add a comment below, and we’ll do our best to help.
Do you have a system that’s worked for you in the past? I love to have you share it in the comments so we can all learn about new ideas and options.